OpenCV에서 OpenNI 이용이 가능하다. 이미 빌드 되어 있는 OpenCV로는 OpenNI를 이용할 수가 없다. 따라서 OpenNI를 OpenCV에서 이용하기 위해서는 아래처럼 cmake로 OpenNI를 위한 설정을 하고 OpenCV를 빌드해야만 한다.
이를 위해서는 OpenNI, NITE, Sensor Kinect가 미리 설치되어 있어야 한다. OpenCV등은 각각 최신으로 다운로드 받으면 된다.
이제 OpenNI를 이용하기 위하여 OpenCV를 빌드하는 방법을 설명한다.
[참고 사이트]
1) http://seevisionc.blogspot.kr/2012/07/compiling-opencv-with-openni-for.html
2) http://talkingaboutme.tistory.com/195
3) http://docs.opencv.org/doc/user_guide/ug_highgui.html
Compiling OpenCV with OpenNI for Microsoft Kinect Sensor
If you already know how to compile OpenCV with Visual C++ then this tutorial will be straight forward for you. However for completeness sake I will write everything in detail, so even if you are new to OpenCV you wont have any problems compiling from the source code.
If you want to use OpenCV with Microsoft Kinect using OpenNI SDK then, obviously, the first pre requisite is that you should have already installed and set up Kinect sensor using OpenNI and NITE libaries. If you have not already done that then please head over to OpenNI installation Tutorial and first install everything needed to set up. If you have successfully set up everything correctly then precompiled samples inside OpenNI and NITE folders should be working with your Kinect Sensor., which means you are good to go with this tutorial.
Building Binaries
To compile OpenCV-2.4.1 with OpenNI support, first download OpenCV-2.4.1 source code and extract it to a folder. For simplicity I use the folder C:\OpenCVFiles\ for all OpenCV installations.
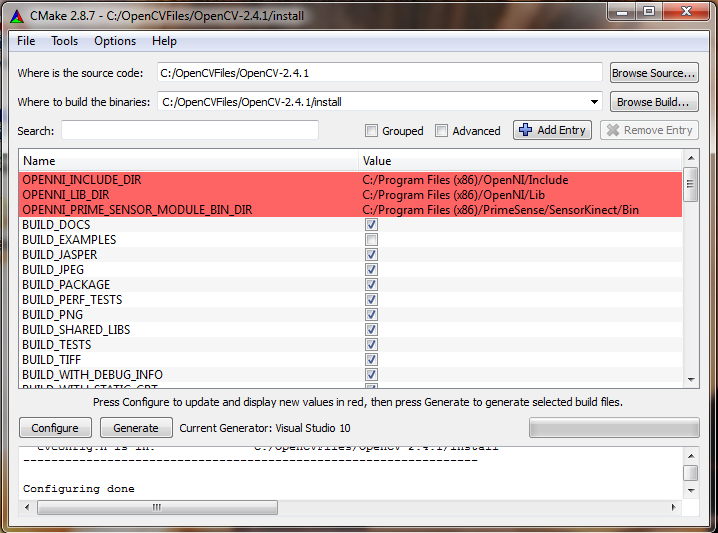
Next step is to use CMAKE to prepare code to be compiled into binaries and libraries. Install latest version of CMAKE with default settings. Once installed open CMAKE from desktop shortcut.
Now browse to the source folder and also enter the build folder as below. I use \install folder for the build but you can use any other location, just make sure that you remember where you placed your build files as these will be needed later to set up your project.

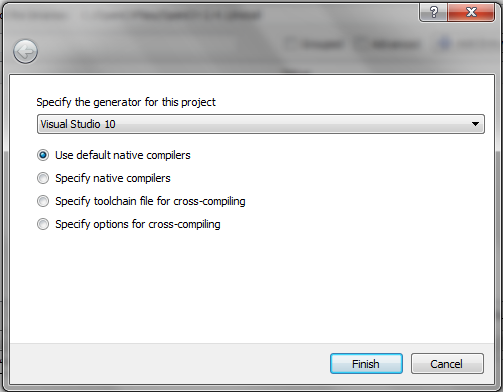
Select Visual Studio 10 with default native compilers

Click configure

Check option WITH_OPENNI and click configure again (그리고 위의 Build Example도 체크한다)

Now finally click Generate and go to install folder to find the file named OpenCV.sln. Open this project file and in the solution explorer towards the left hand side, select ALL_BUILD and build solution. This will take a while.

Once the solution is build successfully for ALL_BUILD option, from solution explorer select INSTALL and again build solution. This will compile the binaries inside the folder
C:\OpenCVFiles\OpenCV-2.4.1\Install\Install

That's it for building the binaries. Next step is to configure your pc to use these binaries in a project.
여기서 주의할 것은 Debug 모드로 그리고 Release 모드로 한번씩 빌드해야 한다. 빌드를 하면 lib와 bin폴더에 각각 debug와 release 폴더가 생기고 그 안에 lib파일과 dll 파일이 생긴다. debug 모드로 빌드하면 파일이름이 d로 끝난다.
이제 컴파일된 example에서 openni_capture.exe를 실행해서 에러 없이 수행되면 일단 빌드는 성공.
Visual Studio를 위한 설정 방법은 위 참조 사이트 2)를 참조하면 된다.
참고로 필요한 dll 파일들(OpenCV와 OpenNI용)은 모두 실행파일과 같은 폴더에 복사되어 있어야 한다.
'프로그래밍 > OpenCV' 카테고리의 다른 글
| OpenCV 환경 설정 및 사용 (0) | 2012.11.17 |
|---|---|
| OpenCV를 이용한 matrix 연산 (0) | 2012.11.03 |